Showing posts with label Windows. Show all posts

Monday, June 26, 2017

How to hide the account names in Windows 10 logon screen


Alright ! for some reason I don’t want others to see that few user accounts from my logon screen of windows 10 / 8.1/8.


here is the sample screen which show all user accounts in the logon screen which is taken from google.


image


Steps to hide the user accounts that you want :-


1. open RUN window and type “regedit” without quotes hit enter

2. Navigate to the below path

    HKEY_LOCAL_MACHINE\SOFTWARE\Microsoft\Windows NT\CurrentVersion\Winlogon

3. Right click the “Winlogon” create new Key called “SpecialAccounts

4. Right click the “SpecialAccounts” create new key called “UserList

5. Right click the “UserList” create new key type DWORD 32 Bit and name it by the account name that you want to hide.

    then set the value of the key to “0

    Example :  assume the user account that I want to hide is “Tom” so the value should be “Tom”.

it will look like the below :

image

that is all. It does not require any reboot to take effect so you can simply lock your screen to see the result.

comment me if you face some issues while trying the steps.

Sunday, June 18, 2017

Docker Installation in Windows Server 2016


Prerequisites :

Windows Server 2016  Standard / above

would like to watch video for the same procedure ?


Steps are below..,

1. Open PowerShell with Admin rights

2. run the below 2 commands one by one and give some time to execute for each command.

   Install-Module -Name DockerMsftProvider -Force
   Install-Package -Name docker -ProviderName DockerMsftProvider -Force
   
   image
3. reboot your machine now either by typing 
   Restart-Computer –Force  or manually.

4. Once rebooted open PowerShell and type “Docker version” to verify the docker installation.
   

Fix - "Windows cannot find the Microsoft software license terms"


Usually this error will popup when you are trying to install a ISO in VMware workstation or Virtual Box and it wont let you install the OS.

     image


to fix this , simple answer is you have to avoid express installs feature in Vmware workstation or Virtual Box.

if you want the resolution in detail, Please follow the steps.


1.  you have to create a New Virtual Machine from the VMware workstation and choose the below marked option which will allow you to install OS later.

     image


2. Keep clicking next until you see the below option and click the “Customize Hardware”


    image


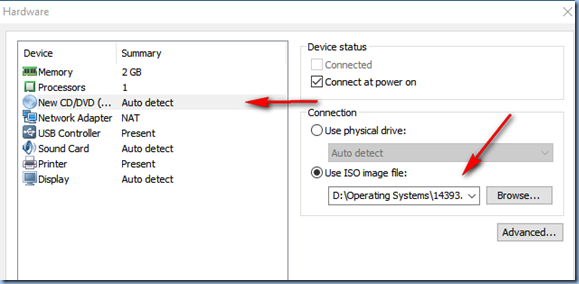
3.  then you have to select CD/DVD option and choose ISO image file as you see below then Finish.

        now you start the virtual machine and get succeed.

   image


Comment me for any clarifications or corrections.

Sunday, May 1, 2016

remove windows preview build watermark on wallpaper


It is annoying the build info sticking in the wallpaper even sometime the windows got activated using other activation methods.

so I just want to write simple steps to remove it easily.

there are few .dll and reg tweaks also possible to remove it but we just gonna use simple freeware tool.


1 .Download the tool from here

2. Just extract and open it as an Administrator

3. Click “Install” right down side of the newly opened wizard , it will sign out from the current session so you have to make sure you close all other apps & windows.

Sign in to windows now you see the magic, yes its gone now.

Sunday, November 15, 2015

set up BgInfo for domain to display system information on wallpaper


I knew its well known and most wanted by IT Admins.just wanted to make the latest info on my post.

simple steps to make BgInfo to display all your system information on your desktop wallpaper. this post is for those who are in beginner level in server administrative.

BgInfo is a tool that will help you to display a system info in wallpaper but the point is how to make that happen in all the computers that you have in your network ?

that’s what we gonna see in this post.

Step 1 : Download BgInfo from here

Step 2 : Open the application the below green color board that you see is your design place , first select all and delete everything make it blank.

add what ever field that you would like to display : it can be added from right side “Fields” tab.

image

Step 3 : You can set the custom background using “Background” button

           use “Position” button to choose where exactly your information should display

           use “Desktops” button to choose the method to Update the current wallpaper with system info.

           use “Preview” button to see the sample view of your current configuration on BgInfo application.

Step 4 : Go to “File” and “Save As” the file save it with your desire name. (which will be saved with extension of “.bgi”)

Step 5 : Open “sysvol” folder incase you not sure how to open it follow below.

Example : my domain name is “san.com” so I can simply open my domain sysvol folder like “\\san.com\SYSVOL\san.com\scripts”

Note : you should have admin access to place the files to here.

Step 6: simply open Notepad and type the below without quotes and save it <filename>.bat

“\\san.com\SYSVOL\san.com\scripts\Bginfo.exe \\san.com\SYSVOL\san.com\scripts\PRDBginfo.bgi /timer:0 /silent”

NOTE : replace san.com with your domain and PRDBginfo.bgi with the file name that you saved using Bginfo application.

Step 7 : copy and place the 3 files into “sysvol” scripts folder in my case (\\san.com\SYSVOL\san.com\scripts).

            Bginfo.exe , PRDBginfo.bgi ( one you created in Step 4) and the bat file you created in Step 6.

Step 8 : Go to your Domain Controller open Group policy Management console either from MMC or run by typing “gpmc.msc”

Step 9 : Right Click your domain and choose “Create GPO in this domain,and Link it here” and name it “BGINFO” or per your wish.

image


Step 10 : right click newly created “BGINFO”  GPO and “Edit”

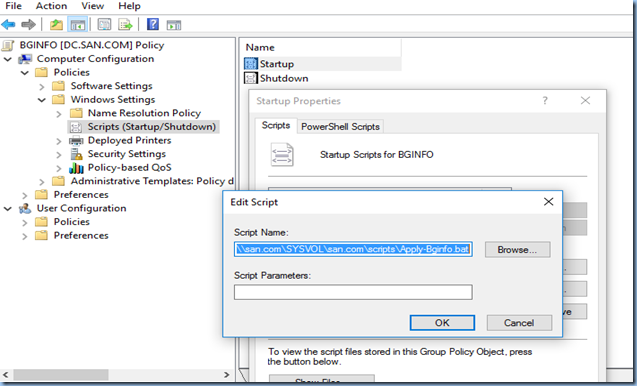
              Go to Computer Configuration => Windows Settings => Scripts =>Start up and click Add button and locate the bat file you placed in Step 7

then Click OK twice.
image


Step 11 : Now in left pane go to User Configuration => Windows Settings =>Scripts => Logon and click Add button and locate the bat file you placed in Step 7

then Click OK twice close the windows.

Now you can just log off and log in back and see the wallpaper which take effect on any machines in the domain which is member of the domain. 

Saturday, November 14, 2015

How to repair Dual Boot entries in windows


Scenario :- I had 3 windows operating system installed on two disks accidentally two entries removed when i was in windows10 OS, when i reboot it did not give option to boot to other operating systems, simply booting into Windows 10

# I am not ready to install other OS again.

here are the simple steps that i followed to recreate it.

Step 1 Download EasyBCD freeware tool from here and install it.

Step 2 Open the installed EasyBCD under default “View Settings” you can see current boot entries.

image

Step 3 go to “Add New Entry”  choose “Type” Windows Vista/7/8/10.

then “Name” type OS name, then “Drive” choose the exact installed OS drive letter. Click “Add Entry”.

image

Choose “BCD Backup / Repair “ to take backup of settings before you do changes.

you are good to restart your PC to see your new entries.

email me for any issues.

Tuesday, October 20, 2015

Fix - Google chrome address bar search not working


Many people have this problem with their chrome browser but solution is not easy to find out.

I love Chrome browser because of its speed but it needs to be improved in few areas like single tab opening when you open the chrome for first time.( workaround Foo Tab extension).

alright let me show you fix…,

Step 1    Open Chrome browser –> Settings –> Manage search engines

                  image

Step 2  add “https://www.google.com/search?q=%s” without quotes like the below format call it “Google2”

image


That’s it. no restart required. your address bar will start to search for you.

still issues ?  contact me

Wednesday, October 7, 2015

Stop auto play videos on Facebook account


most annoying feature that I never want to use on Facebook is auto play videos , even if you are in high bandwidth many times it is  creating  a lot of problems which really make you to frustrated.

I hope you also searching for that disable it , that’s why you are seeing this post.

its pretty simple thing.

Just login to Facebook in any browser then click the link below then you will see the below page.

Step 1 : https://www.facebook.com/settings?tab=videos

Step 2 : switch to “Off” in on the Auto play Videos also I change to SD only for video quality if you are in low bandwidth.

That’s it. Enjoy!

image

Thursday, July 9, 2015

How to remove OneDrive completely from Windows 10


This post obviously to remove OneDrive completely from Windows 10 even this method will work on recent builds.

First of all I really hate to have OneDrive within my PC for few reasons

1. I don’t know why but I frustrated all the time when I see it in my explorer

2. I don’t like this to be synced and sitting in background process.

image

Microsoft was allowed to remove manually in their older builds but it’s not possible with recent build so we found the manual method but you know its bit complicated so looking for the automated finally I got it from MELERIX from Microsoft forum who packaged all together to make it run very simple.

alright I talk to much for the simple steps, lets start it,

1. Download the bat file here

2. right click the downloaded .cmd file –> Run As Administrator

3. wait for the progress until you see Press any key on the black screen then press any key

4. Close all opened windows then open the explorer you should not see OneDrive icon anymore.

image

Thanks to MELERIX

Wednesday, July 8, 2015

Windows 10 : How to remove previous installation files safely after an upgrade


I am righting this post to do remove the previous versions of windows 10 system files safely.

many of my friends who are all working as developers and into application development on windows 10 use to call me for the same even they knew sometime this is the procedure but they wanted to double check with me.

I am currently using Windows 10 build 10162 which is the most recent update from Microsoft.

Microsoft really showing good improvements in their recent build.

Many will face the space issue after you upgraded to the next build of windows 10 that lacking space on system drive. this is not only with 10 but it was with all the previous windows versions. still the procedure is same for all the versions I was asked to wright the one.

image

Note : Once you removed the previous installation files you will be not able to go back to previous build anymore so Please keep it in mind before you proceed the below steps.

here are the steps to remove :-

1. right click the windows 10 installed drive –> properties –> Disk cleanup –> Cleanup system files (see below images)

image  image

2. select “Previous windows installation(s) then Click Ok and wait for the removal

Note : Don’t worry about the below warning just hit Yes to clean.

imageimage


Enjoy!

write to me for any issues.


Sunday, July 5, 2015

One tab loading to speed up Chrome browser


I have already written a post to make the chrome to load faster by using “One Tab” Chrome extension.

there is an easy way with another extension that called FooTab which makes easier to make the Chrome browser to load faster at the time of start up.

Its automatically load the active tab which was opened at the time of closing the Chrome but restrict to load other tabs until you click that tab.

this feature is available on firefox built in.

Big thanks to goes to mike-sf-outlook who have published this on Sourceforge.

Install this from Chrome store or Sourceforge and enjoy!


Saturday, May 16, 2015

Fix :- Gmail and other few SSL websites not working on Firefox


You might have noticed or came across the below error on Firefox especially when you tried to access Gmail and few others SSL sites.

image

I am going to share with you guys the fix that worked 100% for me so far.

as per my understanding this is happening almost when you are importing the bookmarks , cookies while you install Firefox.

alright lets talk about the simple fix.

1. Open Firefox then press “Ctrl + Shift + Del” or go to History from menu then choose Clear History

2. Choose Everything on the top then make sure you have checked the Cache & Cookies then hit Clear Now.

image


Once done just close and open the Firefox to see the different.

Edited : May 19 2015

According to Mozilla the recent update should fix this issue.

image

write to me if this is not works.

Sunday, April 12, 2015

multiple remote / RDP sessions hack on Window 8.1


I bought high configuration PC to setup test lab , I done test lab but unfortunately i need to share the same pc with my friends through internet so that they can also utilize.

the default terminal access will not allow more than one concurrent connection so I had to patch my terminal dll file.

Thanks to Peter Kleissner, who wrote the code to patch the existing windows 8.1 machines.

How I did it?

Step 1  download the patched file from here 

Step 2  open “services.msc” from “Run” / “Search” then stop “Remote Desktop Services”

Step 3  Go to “C:\Windows\system32” and replace the termsrv.dll file which you have downloaded.

Step 4  Go back to services which you have opened in Step 2 then start the “Remote Desktop Services”

Note: You may need to patch every time after windows updates as few windows update will bring this dll back to original.

you can take remote (RDP) not only two but more than two RDP concurrently possible.

Please feel free to write to me for questions.

Monday, March 9, 2015

How to fix 99% Disk usage on Windows 8 / 8.1 / 10


Did you ever notice that your Windows 8 laptop / machines will start to eat your disk with 99% usage as soon as you login ?

well, when I installed windows 8 for the first time on my laptop I started to dig about the features and excited to make use of it after few months ago I realized that some kind of laggings at the time when i sign in to my laptop but after couple of mins i could feel the speed.

I could not control myself , so started to troubleshooting, task manager shows that my disk utilization nearly 99% while I am watching it came back to around 28% in couple of mins

I faced the same problem on Win 8 , 8.1 and 10 preview build too. blaming 10 it is not worthy as it is still in building stage.

image


before I try few things I decided to go to Microsoft but unfortunately there was no response on the forum.

Google took me to the many forums that talks about the same issue and endup with disabling services.

Yes I just disabled superfetch service and disabled the auto page file.

What is Superfetch ?

SuperFetch is a technology in Windows operating systems that automatically preloads commonly used application into the computer memory which in return greatly reduces their loading times. The purpose of SuperFetch is to increase the performance of the PC during regular tasks performed by the user.

How to disable this ?

goto RUN and type “services.msc” –> scroll down to “superfetch” –> properties –> disabled –> stop—>apply—> Ok

WIndows 8 Services Superfetch

How to stop Auto Paging file ?

Open Computer –> Properties –> Advanced System Settings –>Advanced—> Settings on Performance section

image

again Advanced on the new window –> Change

Uncheck the “Automatically manage paging file size for all drivers”.

Click “SET” then Ok for all rest of the windows / wizards.  reboot at last.

image

Now my windows 8 /8.1 /10  running better than before.

Saturday, February 14, 2015

How to remove Windows 10 preview build watermark


let me come straight to the point, yeah I hate seeing the build & preview watermark on my windows 10 desktop

I removed in the same way on Windows 8.1

You can download very tiny tool from here / here

Open the tiny exe file as Administrator

image 


will take few seconds to open then just click the “Remove all watermark” and apply new settings

will ask to reboot

just reboot without second thoughts

You will see the magic once you have rebooted.


Enjoy !

Please let me know if you are get in to trouble.

Saturday, January 24, 2015

Windows 10 Jan 2015 Build available now..,


I have been using the Windows 10 Preview build since Microsoft made it available through Insider.

they brought the start menu back and few other added features too, I enjoyed playing with Windows 10 and obviously with some bugs.

in Jan Event the Microsoft introduced its next build and its available through Insider.

Did they really improved the product , lets check it out…,

image

to download Windows 10 Jan Build http://windows.microsoft.com/en-us/windows/preview-download

image

to check SHA-1 hash value Download

Help Microsoft to improve the quality of the product.

Thursday, January 22, 2015

WhatsApp on PC – It’s official now..,


I have been using many tricks to use whatsapp on my PC but the day has came, yeah no more tricks required

to install / use whatsapp on PC.

Whatsapp company has launched web interface where people can use it on PC but sadly not for Apple users.

https://web.whatsapp.com/

Updated : now supports Firefox,Chrome,Opera

currently its running only on Google Chrome browser soon it will be available for other browsers too.

image

How to use it ?

it can be done in few easy steps

Note : You should be updated to latest WhatsApp from Play store.

Step 1 :  Go to https://web.whatsapp.com/ on your chrome browser

Step 2 :  open your WhatsApp on your phone then click 3 dots button on top right choose “WhatsApp Web”

Step 3 : Capture the Image which is showing on your chrome browser

You all set !!! you will see like the below.

 image image

Microsoft Windows 10 Jan 2015 Event Highlights


I am really expecting lot from Microsoft in Windows10 and I am sure they are working hard to help / impress us (Windows lovers).

I am excited about 4 things in this event

1 Cortana ( talk to the device)

2 Spartan (New web browser)

3 Surface HUB (for meetings in corporate office)

4 Hologram studio definitely Google gonna feel shame on its Glass (Virtual reality comes true)

Overall intro for top features :-

Here are the few things that I would like to highlights in base Windows 10 operating system

* Microsoft announced that Windows 10 free for first year.

* Updated Action Center from Right side pane.

* Notification area with Image support.

* Control Panel got New UI.

* Auto enter Tablet mode once your remove Keyboard and Mouse.

* Improved multi tasking. 

* Cortana Improved lot for PC (Unique) ,Tablet  and Mobile devices with search support.

* Action Center Synched up with PC.

* Settings UI designed same for all devices.

* Keypad on the phone can be swipe to left or right side to make it easier for one hand use.

* SMS / Skype merged to be have good experience.

* office got new designed with improved touch experience.

* outlook app / calendar will be the universal for PC,Tablet and Phones

* New Browser called Spartan ( you can write on the page by pen or fingers) can be copied to anything.

    -  Reading mode and list ( Universal device)

    -  Auto results pop ups like Google’s

    -  MAP Integrated with Cortana


Watch Full Microsoft Live Event by CNET :-

Saturday, December 6, 2014

Lync Troubleshooting: Your Computer Is Running Slowly and Affecting Audio Quality


I am using Lync in my office laptop , past few months I was not able to use Lync calls and was getting the exactly above subject line as a error so I contacted help desk , reinstalled Lync, they tried many things but unfortunately they were not able to fix it.

I also started to Google but no luck after trying many suggested things

Finally found the fix and here it is..,

Step 1  Completely Close Lync

             Right Click the Lync Icon near by Time on Task bar then Exit.

             Kill any communicator.exe in Task manager

Step 2  Right Click Lync Icon and go to properties –> Compatibility Mode

Step 3  Uncheck the “ Run this Program in Compatibility mode for “

           Note : In my case it was checked to “Windows XP (Service Pack 3)”

Sorry I could not attach screenshots due to my office laptop.

Safely Remove windows.old folder in Windows 8.1


This is applicable on Win7 / 8 / 8.1 / 10

I have recently refreshed my Windows 8.1 and  I noticed that windows.old folder was consuming 5.7 gb so I decided to delete but there was few permission related bugs it was not allowing me to remove completely.

here is the simple and safe procedure which is recommended by Microsoft .

Capture

1.  Control Panel search box, type Admin, tap or click Administrative Tools, open Disk Cleanup.

2.  If you're prompted to choose a drive, select the drive that you just installed Windows on,

3.  In the Disk Cleanup dialog, click Clean up system files.

4.  If you're again prompted to choose a drive, select the drive you just installed Windows on, and click OK.

5.  Select the Previous Windows installation(s) check box, and any check boxes for the files you want to delete, and    …..then click OK.

6.  In the message that appears, click Delete files.

win