Thursday, May 30, 2013

Fix the failing Locator on the startup in GemFire


This fix is applicable for GemFire 6.x and 7.x.
If your terminal or command prompt fails while starting the locator for the first time in Network Discovery
Symptoms :
  • When you start VMware vFabric GemFire, the locator connection begins, but fails after discovery.
  • Connection can fail with cache servers, but is typically observed with locators first.
Cause :
  • This occurs when UDP is blocked (such as by Windows Firewall), which vFabric GemFire uses to communicate between peer members, such as cache servers and locators.
  • Since the initial connection for locator discovery is made via TCP, a firewall rule set that allows TCP, but prohibits UDP connections, allows the initial discovery while blocking the member-to-member connection.

Resolution :
To resolve this issue, allow the necessary UDP traffic.
To do so:
  • Remove the firewall rule that blocks UDP traffic
    or
  • Set “membership-port-range” in the gemfire.properties file to restrict the port range used for membership communication.
image

Not sure how to Allow / Deny the ports in Windows firewall ?
http://technet.microsoft.com/en-us/library/cc947789%28v=ws.10%29.aspx
in RedHat Enterprise Linux ?
http://www.techotopia.com/index.php/Basic_RHEL_5_Firewall_Configuration
Write to me if you get struck

Monday, May 27, 2013

Vfabric GemFire - Firewalls and Ports

 
For a server, there are two different port settings you may need to be concerned with regarding firewalls:
  • Port that the cache server listens on: This is configurable using the cache-server element in xml, on the Cache Server class in java, and as a command line option to the cache server script.
  • Locator port: Gemfire clients can use the locator to automatically discover cache servers. The locator port is the same one that is configured for peer-to-peer messaging. The locator port is configurable in as an option to the Gemfire start-locator command.
Default Ports
Port Name
Default Port
HTTP
8080
RMI
1099
RMI Server
0
Bridge Server
40404
Gateway Hub
1
Cache Server
40404
Multicast
10334
TCP
ephemeral port
Membership Port Range
1024 to 65535
Locator
no default
For a client: you tell the client how to connect to the server using the pool options. In the client's pool configuration you can create a pool with either a list of server elements or a list of locator elements. For each element, you specify the host and port to connect to.
By default, Gemfire clients and servers discover each other on a pre-defined port (40404) on the local host.
Each gateway-hub usually has a port where it listens for incoming communication and one or more gateways defined for outgoing communication to remote hubs.
Limiting Ephemeral Ports for Peer-to-Peer Membership
By default, GemFire assigns ephemeral ports, that is, temporary ports assigned from a designated range, which can encompass a large number of possible ports. When a firewall is present, the ephemeral port range usually must be limited to a much smaller number, for example six. If you are configuring P2P communications through a firewall, you must also set each the tcp port for each process and ensure that UDP traffic is allowed through the firewall.
Properties for Firewall and Port Configuration
This table contains properties potentially involved in firewall behavior, with a brief description of each property. Click on a property name for a link to the gemfire.properties topic in the GemFire Reference section.

Gemfire Properties
gemfire.properties
Setting
Definition
peer-to-peer config
Specifies whether sockets are shared by the system member's threads.
peer-to-peer config
The list of locators used by system members. The list must be configured consistently for every member of the distributed system.
peer-to-peer config
Address used to discover other members of the distributed system. Only used if mcast-port is non-zero. This attribute must be consistent across the distributed system.
peer-to-peer config
Port used, along with the mcast-address, for multicast communication with other members of the distributed system. If zero, multicast is disabled for member discovery and distribution.
peer-to-peer config
The range of ephemeral ports available for unicast UDP messaging and for TCP failure detection in the peer-to-peer distributed system.
peer-to-peer config
The TCP port to listen on for cache communications.
Server Configuration Properties
gemfire.properties
Setting
Definition
cache server config
Hostname or IP address to pass to the client as the location where the server is listening.
cache server config
Maximum number of client connections for the server. When the maximum is reached, the server refuses additional client connections.
cache server config
Port that the server listens on for client communication.


Saturday, May 25, 2013

How to deodex stock rom for galaxy S DUOS S7562


Deodexed roms are firmwares where the .APK files of the System Software itself are packaged in a way so that they can be modified easily without causing any harm to the framework or the Android Environment.
This tutorial will cover all the steps required to deodex stock rom for galaxy s duos s7562, so that you don’t need to install a Custom Rom yourself!
Disclaimer: Follow all the instructions carefully mentioned in this article, I should not be held responsible in any manner if your Android Device doesn’t boot up or gets bricked due to not following the instructions.
Required :
1. Your device should already be rooted.
2. You should already have Android ADB in your computer and should have basic ADB knowledge.
3. JDK already installed in you’re PC (http://www.oracle.com/technetwork/ja...s-1859576.html)
4. 7zip installed (http://www.7-zip.org/download.html)
5. Cygwin installed (http://www.cygwin.com/)
6. dsixda's Android Kitchen installed (http://forum.xda-developers.com/showthread.php?t=633246)
7. Busybox should already be installed in your device.
8. CWM already in you’re phone
9. Make nandroid backup (just in case).
10. sgs2toext4.jar ((created by drphrozen) attached
11. DiskInternals LinuxReader (http://www.diskinternals.com/download/Linux_Reader.exe)
Tutorial :
1. Download you’re favorite stock rom
2. Use 7zip to extract it (ignore errors)
You will have these files, we need only system.img.ext4

3. We have to convert it to ext4 format with sgs2toext4.jar
Open a command window and set the directory where you have sgs2toext4.jar file.
Now type sgs2toext4.jar and press enter
The .jar will run in a new window & will ask you to drag & drop the system.img.ext4 file there.
Do the same and wait till the process completes


4.Open the results file with DiskInternals LinuxReader an extract all files in new folder named system


5.Compress the system folder with 7zip (tar and store format) named system.img.ext4.tar

6.Put the file in kitchen folder (in original_update)

7.Lunch Cygwin terminal an cd to kitchen folder and load the menu (./menu)


You have to modify the API from 10 to 15
Look the file in C:\cygwin\home\user\kitchen\tools\deodex_files (api_level.txt)
8.Choose option (1) and do like these :


9.Choose option (0) ADVANCED OPTIONS

10.And then option (11) deodex files in your ROM
Then (b) deodex both folders and then (y)

Take a caffe and be patient, the operation take a time to finish, if all operation finish without problem you will have this :

However, some apks failed to deodex, see the screenshot, for me only one apk failed it’s not very important
To resolve this, go to :
C:\cygwin\home\user\kitchen\WORKING_xxxxxx_xxxxxx\ system\app\
and delete the odex apks (you can recognize them by their respective .odex files present in the same folder)
Make sure to delete both apk as well as its respective .odex file.
you can close the kitchen now if you do not want to add more MODs
THATS IT ! you have successfully deodexed both /system/app as well as /system/framework/.
Now to port the deodexed rom do the following :
11.Copy both app and framework folders to your sdcard, from :
C:\cygwin\home\user\kitchen\WORKING_xxxxxx_xxxxxx\ system\
12.Connect your phone to computer.(Make sure you have select USB debugging in Settings>Developer options>USB debugging
13.Open Command prompt, Goto folder where android sdk installed. Then goto platform-tools folder in it. Right click on free space in folder while pressing shift key.Select open command prompt here.
Now enter commands. )
14.Enter following codes:

Code:

adb shell
su
stop
mount -o rw,remount /system/ /system/
cp /sdcard/app/* /system/app/
rm /system/app/*.odex
cp /sdcard/framework/* /system/framework/
rm /system/framework/*.odex
mount -o ro,remount /system/ /system/
reboot

(if you are using adb shell in su for the first time, keep phone screen on. After entering "su" code, super user request prompt in phone. Press allow )
who look for my cygwin i used in this tuto
https://docs.google.com/folder/d/0B7...N3M/edit?pli=1
just extract it in c:\ lunch Cygwin.bat it will creat your user folder in c:\cygwin\home
then move kitchen folder in cygwin\home to your user folder created
cheers
all credits goes to devs from this great forum

ATTACHED FILES

File Type: jar
sgs2toext4.jar - [Click for QR Code] (19.9 KB, 18 views)

File Type: 7z
screenshots.7z - [Click for QR Code] (1,012.0 KB, 15 views)

File Type: 7z
adb.7z - [Click for QR Code] (115.9 KB, 8 views)

File Type: txt
api_level.txt - [Click for QR Code] (2 Bytes, 14 views)


Thanks to Senior Member OP

Windows 8 - ADB/fastboot driver issue FIX !!!


After installing Windows 8, you cannot install fastboot drivers, but it recognizes the ADB drivers...
Solution:
1. Open the dev-manager, by typing following, in a command prompt window, or the run dialog. Whichever you prefer... :

Code: devmgmt.msc

Now, the device manager, should pop up.
2. Install ADB drivers, (If you do not have them present, download them here)
To prevent confusion: When I say install, it can mean unpack, or install... Quick tip: An installer does nothing, apart from unpacking files, to allocated space, on your computer 
Download USB drivers, from here. (Link fixed. Again (-_-") )


Should you NOT have drivers installed:
3. Install the USB drivers, and download ADB/fastboot drivers.
4. Installation of ADB/fastboot drivers:
     Open the device manager, and look for "Samsung Mobile Device", or "Unidentified Device". You can   make your search easier, by unplugging the phone, whilst in device manager, then plug it back in, and see what's changed...
Once you have found your phone, Perform a right-click, on the device. Select : "Update device drivers", once the dialog has popped up, choose "Browse my computer" and goto your desktop, where you have installed the files to.
Open just the "drivers" folder, nothing else...
Select OK, then wait for installation to finish.
Once that has been done, you need to reboot your device, into bootloader mode; do this by typing

Code:

path=%userprofile%\Desktop\ADB\
adb reboot-bootloader

into the command prompt (download & install this, if you want to do it the cmd-way...)
Or, turn off your phone, and reboot i it manually into bootloader-mode, by pressing

Code:

VOL UP +DWM & PWR

together, until phone vibrates...
Once the phone is in boot loader, go back to the device manager, and look for a device named "android 1.0". Perform a right-click on this and select "Update device drivers". Again, select "Browse my computer", but, instead of clicking on "Browse" and selecting the folder, again, select "Let me pick from a list of drivers." Once the menu has popped up, select "Samsung Android ADB interface". Click OK, and wait for the drivers to install . Then, you're done. You have then successfully installed the ADB + fastboot drivers correctly, to test this, open a cmd window, and type following:


Code:

path=%userprofile%\Desktop\ADB\
fastboot devices

If your device shows up, then you have done it!!
Now type:

Code:

fastboot reboot
adb wait-for-device
adb kill-server

Note: while the phone is booting (If you typed "adb wait-for-device") A cursor will blink, wait for that, to stop blinking, then type the next command


I hope you learned, from this tutorial!! Check out Beatsleigher & M4gkman's Universal Android Toolkit, if you have enough time


Should you have problems, in recovery, open your dev. manager, and look for following device:


Code:

Full

Select, right-click. Update driver (blah, blah, witter, droan)
Browse my computer -> Let me pick -> Samsung ADB -> Done. You have enabled the ADB drivers, on your Android Device!!!!


Thanks to Senior member OP

Saturday, May 18, 2013

What is Different with Internet Explorer 11?

ie

Windows Blue is just around the corner, and with it comes Internet Explorer 11. So what’s new in IE 11?

While both the Modern and desktop versions of IE11 don’t look to terribly different on the surface, there are a few new features on the table. While other browsers like Chrome have had tabbed syncing features for a long time, it looks like Microsoft is finally getting on board.

Of course this doesn’t mean quite as much as Chrome’s tab syncing, at least not in my opinion. Why is that? With Chrome you get syncing support for Android devices, PC, Chrome OS, iOS and others. With IE11 you only get support for IE11-supported platforms, which will be Windows Blue, probably Windows 8, maybe Windows 7 and existing Windows tablets. Certainly a much narrower level of supported platforms, but it is better than nothing.

Outside of syncing, what else is coming to IE 11? Inside the modern browser, there will now be a wrench icon that when pushed will bring up a “view Downloads” section that gives you a download list. A small change, but a welcome one.

Then there is also a change to the way the web site tracking protection works in IE11, making it easy to turn it off and on at a user’s request.

So on the whole, is Internet Explorer 11 that vastly different? It doesn’t look like it, but it is an improvement nonetheless.

What feature are you most looking forward to with Windows Blue, Internet Explorer 11, the new usability and customization features, the new apps? Share your thoughts below.

P2V of a Physical Machine with vCenter Converter


P2V is a large subject to cover, as I cannot cover every scenario, so I am going to briefly cover a P2V conversion of an physical Ubuntu server I have kicking around. Many companies are trying to reduce there footprint and convert many physical machines into virtual ones, web servers, SMTP server are ideal candidates. The conversion is a two step process, the actual conversion and the cleanup process after you have created the VM. There are a number of 3rd party P2V converters including free ones but I will be using VMware own vCenter Converter to perform this task. Vware vCenter converter is a windows based application, that installs onto the vCenter management server, it fully supports both windows and linux conversions but you may want to check VMware own website for all the available supported OS's. There are two versions of the converter available

Starter - is agent based and is free
Enterprise - can be either be agent or can boot from a cd

VMware vCenter converter is not a silver bullet, you may have to work with the converted VM to get it working properly, also if the server originally had problems those problems may be replicated in the VM environment. The more complex the physical server (could be a domain control, cluster server, etc), the more you may have problems converting it and getting it to work, here is where you need to look at the VMware forums or search the internet for answers.

Installing vCenter Converter

Installing the vCenter converter is like a normal application installation, on the vCenter server start the installation by putting in the vCenter 4.1 cd, and then selecting vCenter Converter
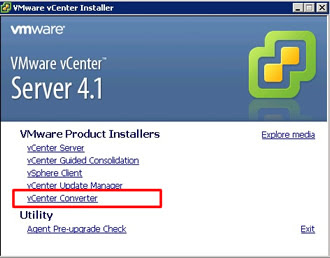
During the installation process, you will be asked about the vCenter management server details

Once the installation has finished select the plugins -> manage-plugins from the top bar of the vCenter window, then select download and install plugin

That's it, you are now ready to convert physical servers

P2V

Once you have the P2V plugin installed we can now import a physical server, I have a old HP D510 desktop PC with Ubuntu 32-bit OS running on it (yep old pc and old OS), lets convert this physical machine into a virtual machine. First select the ESXi server that you wish to import the new virtual machine into, in my case I have selected vmware01, right-click and select "import machine"

Now enter the details of the running physical server, I selected "view source details", just to make sure the connection is working and we have access to the physical server

All looks good, it see's my physical server as a Ubuntu 8.04 32-bit server

The next screen, gives us details on where the VM will be placed, I changed the datastore to a shared storage area (filer2_ds1), you can change the name of the VM if you wish

The screen allows us to configure the VM's hardware

I notice that the network was in correct, so selected edit and changed the network from private to public and can add additional NIC's if you wish

The "data to copy" screen allows us to select what volumes/filesystems we wish to copy across, there may be a case that you do not some volumes/filesystems copied and thus speed up the importing process.

With very little effort we are at the summary screen ready to import our physical server

It took about 5 minutes to import this server, the time it takes all depends on how much data you need to import, you can monitor the progress from the "recent tasks" window in the vCenter man screen

And here we have it, a fully imported physical server, I double checked the hardware settings and it done a pretty good job as I did not have to change anything

When I started the VM, all I had to do was edit the /etc/network/interfaces file and change the NIC to eth3 and up the interface and away we go, as you can see below

Ok not all P2V conversions will go as smoothly as this one did but you get the idea on what is involved and what you need to prepare before hand when performing a P2V conversion. There is also a Cold-Clone boot CD which allows you reboot the physical server from the CD and clone the physical server while it is offline.

Thanks to datadisk UK

Thursday, May 16, 2013

gfsh basic commands for Vfabric GemFire 7


To view a list of available gfsh commands, press Tab at an empty prompt.

The list of commands that you see depends on whether you are connected to a GemFire distributed system. If you are not connected, you see a list of local commands that are available.

image

Use the hint command to get information on a particular topic.

The hint command displays a one-line description and associated commands for a specified topic. For example, typing hint data returns a description of the "data" topic and all the possible actions available for data:

image

Type hint server to view a description of servers in GemFire and a list of commands available for managing and monitoring them.

image

To view a list of hint topics, type hint.

gfsh>hint
Hints are available for following topics. Use "hint <topic-name>" for a specific hint.
image

Use the help command to get information on a particular command.

Depending on the command, typing help <command-name> displays usage information for that particular command or a list of commands related to the command.

For example, type help start to display a list of start commands with short descriptions. The descriptions indicate whether the command is available, depending on your connection status. In the following example, you are not currently connected to a vFabric GemFire distributed system (via connection to a JMX Manager node), so some start commands are unavailable.

gfsh>help start

image


In the following example, typing help export data displays the command name, availability (depending on your connection status), a description, its syntax, and a list of all its required and optional parameters.

gfsh>help export data
image

Use the Tab key to auto-complete a command or trigger possible completions.

Use the Tab key after entering a partial command to trigger auto-completion of the command or a list of possible command completions. For example, hitting Tab after typing hint displays all available topics:

gfsh>hint 
image
Configuration Data Debug-Utility
Disk Store Function Execution GFSH
GemFire Help JMX
Lifecycle Locator Management-Monitoring
Manager Region Server
Statistics WAN


Hitting tab after typing hint d displays the topics available that begin with 'd':

gfsh>hint d

data debug-Utility disk Store
Auto-completion also supplies available parameters and arguments to commands; for example, hitting tab after typing start will list all the processes that can be started.
gfsh>start

start data-browser start jconsole start jvisualvm
start locator start pulse start server
start vsd

Hitting tab after start locator will populate the required --name parameter after the command.

Note: The available commands that are listed varies depending on whether you are currently connected to a distributed system.

Access command history with the Up arrow.

Access a command in your shell history by scrolling through previous commands with the Up arrow.

Delimit multi-line commands with \.

When entering long commands, you can break the command line up by using the \ character as a delimiter.

For example:

gfsh>create region --name=region1 \
--type=REPLICATE_PERSISTENT \
--cache-writer=com.gemstone.gemfire.examples.MyCacheWriter \
--group=Group1 --disk-store=DiskStore1