Saturday, February 23, 2013

How to Setup Belkin Wireless Router by Accessing the Setup page

In this tutorial I am explaining the steps to configure Belkin Wireless N router F5D8233-4 by accessing the web based setup page. Though this tutorial is for a specific Belkin router model, you can use the same procedure to setup most of Belkin Router models. This tutorial is for those who want to setup their router manually without running the setup CD from Belkin. If you want to configure your Belkin router by running the setup CD ,click on the link below for instructions.
How to Configure Belkin wireless router by running setup CD
In this page you can see instructions to run the CD and setup Belkin wireless router. However, to set advance settings on your router it is better configure router by accessing the web based setup page and set the settings manually.

STEPS TO CONFIGURE BELKIN WIRELESS N ROUTER


Before accessing the web based setup page connect Wireless Router to the computer as shown in the image. Here Ethernet port (LAN Port) of the computer is connected to the LAN port of Belkin router using an Ethernet cable. It is like:
  1. LAN Port of Modem is Connected to Internet Port of Belkin Router
  2. LAN Port of Belkin Router is connected to LAN port of Computer
  3. Belkin Router is Switched On
  4. Computer is Switched on

How to connect Belkin router to modem and your computer
Now unplug the power cable from the modem. Let the Belkin router and the computer powered on. Steps to setup Belkin Router by accessing the setup page are:
PS: It is very important that the modem must be switched off while configuring the Belkin Router
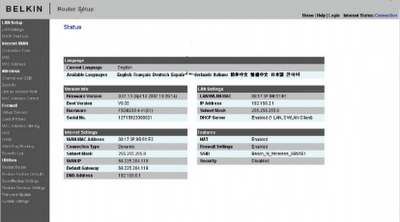
1. Access Belkin setup page
To access Belkin's web based setup page type 192.168.2.1 on the address bar of the browser.
The default login  IP address of  most of Belkin Wireless routers  is 192.168.2.1

Log on to Belkin router setup page

2.Enter the Router Password
By default there is no password set for the Belkin router and you just simply click submit button to log on to Belkin router setup page.

Log on to Belkin wireless router setup page

3. Setup the connection type ( Internet WAN)
Click on Internet WAN and select the connection type you want.

Select Belkin Internet Connection Type

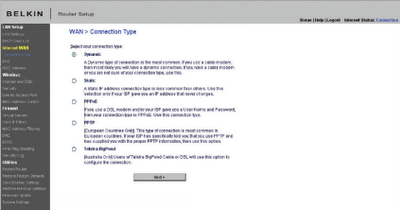
Configure Belkin Router for Cable Modem
If you have Cable Internet connection, you should select Dynamic IP option. In most cases you may need to type the host name provided by Cable Internet Service Provider. In addition to this to work Belkin Router with cable modem, you may need to clone the MAC address of your computer using the link/button change MAC address.
Configure cable Internet connection in Belkin Router
Setup Belkin Router for DSL Modem
To configure DSL Internet connection you should select PPPoE as the connection type.
Belkin Router PPPoE configuration
Here you should enter the user name and password provided by your Internet Service Provider. After entering the details you should click on save settings. Now your Belkin router is configured in PPPoE. In the same way your can setup your Belkin router for static IP and PPTP.
4. Change the LAN settings in Belkin Router
You can change the router IP address and you can enable or disable the DHCP function on the Belkin router using this window. By default belkin router IP address is 192.168.2.1 but you can change it to any other valid IP address.
Change LAN settings and DHCP function in Belkin Router
5. Setup Wireless feature in Belkin Router
To edit the wireless settings, click on Wireless tab in the setup page. You can edit the Wireless network name and wireless channel here.
Change wireless settings on Belkin router - Belkin Wireless Setup
Wireless name (SSID) is the name of your wireless network. The most recommended wireless channel is 6. You can use wireless channel 1 and 11 too.
6. Enable Wireless Security in Belkin
To enable wireless security on Belkin router click on security under wireless tab and follow the instructions in the link below.

enable wireless security in Belkin wireless router

Enable wireless security in Belkin Router
You should update Belkin Router Firmware
It is very important that you should update Belkin router firmware after configuring the router. To know how to update the firmware click on the link below.
How to Update Firmware in Belkin Router
You can select various security settings from the list provided here. To enable a secured wireless network follow the instructions given in the link.
Protect your wireless network from hackers
There are some other points you must care after configuring the router. One of them is to ensure the safety of the wireless network. It is a nice practice to enable MAC address filtering in Belkin Router to avoid any unauthorized access to your wireless network. To learn how to enable MAC address filter in Belkin wireless router, please follow the link below.
How to enable MAC Address Filter in Belkin router
Some users says they were able to access Internet before adding Belkin router in their network. After installing the router, they are not able to go online. If you face such an issue after setup Belkin Router in your network, follow the link below to fix the issue.
I cannot go online after installing router


Source : www.corenetworkz.com

Friday, February 15, 2013

Whats New in Android 4.2

First and foremost Android 4.2 is still “Jelly Bean”, not “Key Lime Pie”, not “Kit Kat”, not (insert your favorite dessert that starts with the letter “K” here). Instead, Android 4.2 is “a new flavor of Jelly Bean”.

This means a few things: most importantly that it’s an iterative build, not a major build; and it implies that all devices currently running Android 4.1.x (which is also “Jelly Bean”) will get the Android 4.2 upgrade — sooner or later.

Code names aside, what’s in 4.2? Google has gone on the record saying that Android 4.2 is “the simplest and smartest version of Android yet”. Why? Let’s take a look!

Camera

new camera

reworked the camera, adding an entirely new photo experience they’re calling “Photo Sphere“. Unlike the “old” panorama mode, Photo Sphere takes individual shots and wires them together to create “stunning 360-degree immersive experiences that you can share on Google+ with friends and family”.

Gesture Typing

Android 4.2 includes a re-worked keyboard that’s supposed to make typing “easier than ever” by letting you Swype ”glide” your finger over the letters you want to type. When you’re done with a word just lift your finger and Android will automagically add a space for you.

new keyboard

That Swyping motion reminds me of something… hmmm

Like the previous iteration of the Jelly Bean keyboard, the “new flavor” keyboard anticipates and predicts your next word for super-fast “typing”.

They didn’t stop there. The dictionaries have been improved and are reportedly “more accurate and relevant”, and they improved the text-to-speech bits while they were at it.

Wireless Display

Who needs wires?

Android 4.2 is making watching content on your big-screen easier — without wires. You can watch movies, YouTube videos, or any of your Android’s screen on any HDTV. If your TV supports the Miracast standard you’re all set, if not all you need is a wireless display for your TV.

This reminds us a of the ill-fated Nexus Q.

Multi-User Support

Keep your grubby little fingers offa my homescreen!

You know what I hate? Handing my tablet over to one of my kids to keep them entertained “for a few minutes” only to discover that their “entertainment” was changing my wallpaper, rearranging my icons, and messing up my tablet!  No more!

In Android 4.2 you can now set up multiple users, so everybody can have their own space. They can set their wall own homescreen and wallpaper, widgets and apps, and they can even have individual high scores and levels on their games. (It sounds like each user will have to buy their own copy of apps, but this has yet to be confirmed.)

Alas, this feature is for tablets only — at least until the custom ROMmers get ahold of it!

Daydream

Just a big clock? Not anymore!

If you’ve got a dock for your phone or tablet you’re probably under-impressed by the fact that, when docked, your device is essentially a “big desk-clock”. Android 4.2′s “Daydream feature” lets you display your photo albums or even news from Google Currents and “more”. Not only that, apparently this feature works when docked or when “idle” — though we’re not quite certain what “idle” means.

Google Now

Google Now — even more “smart”

Google Now got a HUGE update. It can now tell you more information about flights, hotels, restaurant reservations, events, shipped packages, movies, concerts, stocks, developing and breaking news stories, and even nearby attractions and photo spots.

Google Search

For Android 4.2, Google Search gets a new look and is powered by something they’re calling Knowledge Graph, which tries to give you “a precise answer” to all your questions.

Wireless Charging Standard?

The Nexus 4 includes wireless charging (which some of us at Pocketnow think is über-cool and others think is a big yawn). Regardless, it stands to reason that extra bits were added to Android codebase to enable and control the wireless charging components tucked inside the Nexus 4. This could potentially speed adoption of charging without wires, and make it more of a standard among Android-powered devices. Curiously, the Nexus 10 tablet makes no mention of wireless charging.

vFabric GemFire Supported Configurations


vFabric GemFire is supported on a variety of platforms, as a standalone product and as part of VMware® vFabric Suite™.
 

32-Bit Platforms


Operating Systems :
RHEL 5 ,Solaris 9 ,Solaris 10 , SLES 10 ,Windows XP SP3  Windows 2003 Server SP2 ,
Windows 2008 Server R1 ,Windows 2008 Server R2 , Windows 7 Ultimate ,Windows 7.

The Microsoft Loopback Adapter is not supported

Detailed Table view
 

64-Bit Platforms


Operating Systems :
RHEL 5 , RHEL 6 ,Solaris 10 ,SLES 10 , Windows 2003 Server SP2 (pure Java) ,Windows 2008 Server R1
Windows 2008 Server R2 , Windows 7 Ultimate , Ubuntu 10.04.

The Microsoft Loopback Adapter is not supported 

Detailed Table view
Pure Java Mode and Other Configurations
Note :-  GemFire can also be installed to run in pure Java mode on any standard Java platform with some functional differences. However, this type of configuration is not tested and should not be used for production purposes without consulting with VMware support first.
 
Pure Java Mode and Other Configurations
Production Support and Developer Support


Saturday, February 9, 2013

INSTALL JELLYBEAN---ANDROID 4.1 Galaxy Note GT-N7000 Brick Free

STEP BY STEP GUIDE---INSTALL JELLYBEAN---ANDROID 4.1 Galaxy Note GT-N7000 Brick Free
(This method does not work on GingerBread..)
No need a PC..
INFACT..CAN BE USED TO FLASH ANY KERNEL ..AND ANY ROM.. JUST CHANGE THE KERNEL/ROM FILE YOU WISH TO FLASH..
Downloads:

Root_SuperSu: http://forum.xda-developers.com/atta...1&d=1345786322
“Mobile Odin” pro: https://play.google.com/store/apps/d...odin.pro&hl=en
Safe Kernel Hydracore: http://forum.xda-developers.com/show....php?t=1749863
JB 4.1 nightlies: http://get.cm/?device=n7000&type=nightly
Gapps: http://goo.im/gapps

You are unrooted/1st time experimenting--> Start from Step No.1
Already (rooted + Unsafe kernel)--> Start from Step No.2
Already (rooted + SAFE kernel)--> Start from Step No.3
1. ROOT YOUR DEVICE
a. Reboot to recovery (vol.up+home+power button)
b. Select Install zip from Memory
c. Select Root_SuperSu 0.95 you have downloaded and flash it
d. Reboot your galaxy note
2. INSTALL SAFE KERNEL
a. Install MobileOdinPro
b. Open Mobile Odin (let it auto download something)and select Kernel and select the HYDRACOREKERNEL file you have downloaded
c. Device will reboot
d. Voila..You are now EMMC bug free. Wipe it onn
3. WIPE DATA
a. Reboot to recovery (vol.up+home+power button)
b. Select wipe data/factory reset & wipe cache partition
4. FLASH ROM
a. Select Install zip from Memory
b. 1st select JB file
c. Then select Gapps
d. Reboot
WOW…!!!!! Jelly Bean on your Galaxy Note..!!!
Owning Galaxy Note is lucky...And you are even luckier..
PLEASE FOLLOW THE GUIDE TO THE CORE. Else only you will be responsible.0


Thanks to Member - OP

Friday, February 8, 2013

What is special in GemStone - GemFire?


I hope you guys spend some time with previous posts which is describing about GemFire so I would like to dedicate this post to talk about features of GemFire.
Features of GemFire :
GemStone GemFire, an in-memory object caching system pluggable into any JVM. GemFire is intended to provide a zero-latency object cache for applications running on multiple JVMs.
GemFire uses Operating System style shared-memory techniques, which offers real time performance by eliminating disk and network bottlenecks.
GemStone GemFire, zero-latency performance software that significantly improves the performance and scalability of real-time business applications, enabling customers to make split-second business decisions, immediately adapt to market changes and increase user and system productivity.
GemFire is the first product to allow data to be shared across multiple Java™ virtual machines at the application level using shared-memory techniques, which offers breakthrough performance by eliminating disk and network bottlenecks.
GemFire will make it easy for developers to integrate shared-memory technology incrementally into existing Java, C and C++ architectures without overhaul to the application, and build it into new applications without having to learn the intricacies of shared-memory programming.
GemFire Offers Features to Enhance Performance, Administration and Development
GemFire Increases Performance:
· Uses shared memory for sharing data, object change notification, thread synchronization and garbage collection across multiple virtual machines to significantly increase the performance of applications
· Enables the creation, access or manipulation of shared data from thousands of concurrently executing application components at in-memory speeds
· Optimizes general-purpose programming commands for fast, safe performance in high-volume environments
· Reduces unnecessary database communication on a customer’s systems as much as 98 % and is over 40x faster
GemFire Reduces Administration Time and Costs:
· Automatic garbage collection of the shared-memory object space
· Console for configuration, starting and stopping GemFire
· Unobtrusive, fast performance monitoring of both system and application-defined statistics
· Can be introduced into an existing architecture incrementally without overhaul to the application
GemFire Enables Faster Time to Market for Java Developers:
· Expresses shared memory capabilities in familiar Java form, so developers don’t need to learn shared-memory programming
· Provides an off-the-shelf software component that can be incrementally integrated into existing architectures and built into new applications
· Extends the simple Java synchronization model without additional programming
· The desired high-performance in applications can be realized with simple programming ensuring high developer productivity and fast deployment of business applications.


Wednesday, February 6, 2013

How to Install and Run GemFire


Prerequisites :

1. Download : http://www.springsource.com/products/gemfire-evaluation-download
2. Download : JDK from Oracle site
 

To Install the JDK Software and Set JAVA_HOME on a UNIX System


  1. Install the JDK software.
    1. Go to http://java.sun.com/javase/downloads/index.jsp.

    2. Select the appropriate JDK version and click Download.
      The JDK software is installed on your computer, for example, at /usr/jdk/jdk1.6.0_02. You can change this location.
  2. Set JAVA_HOME.

    • Korn and bash shells:
      export JAVA_HOME=jdk-install-dir
      export PATH=$JAVA_HOME/bin:$PATH

    • Bourne shell:
      JAVA_HOME=jdk-install-dir
      export JAVA_HOME
      PATH=$JAVA_HOME/bin:$PATH
      export PATH

    • C shell:
      setenv JAVA_HOME jdk-install-dir
      setenv PATH $JAVA_HOME/bin:$PATH
      export PATH=$JAVA_HOME/bin:$PATH


  3. Change the permissions to enable you to run the GlassFish ESB Installer.
    chmod 755 JavaCAPS.bin


To Install the JDK Software and Set JAVA_HOME on a Windows System


  1. Install the JDK software.


    1. Go to http://java.sun.com/javase/downloads/index.jsp.


    2. Select the appropriate JDK software and click Download.
      The JDK software is installed on your computer, for example, at C:\Program Files\Java\jdk1.6.0_02. You can move the JDK software to another location if desired.

  2. Set JAVA_HOME:


    1. Right click My Computer and select Properties.


    2. On the Advanced tab, select Environment Variables, and then edit JAVA_HOME to point to where the JDK software is located, for example, C:\Program Files\Java\jdk1.6.0_02.

Install Gemfire :


Locate the GemFire package folder in terminal / command prompt  then execute the below command to install GemFire on your machine.

%JAVA_HOME%\bin\java.exe -jar GemFire65_Installer.jar

This installs the Gemfire
 

Running GemFire Application :


1.  Set the JAVA_HOME environment variable to point to your Java runtime installation. There should be a bin directory under JAVA_HOME.
2.  Set the GEMFIRE environment variable to point to your GemFire installation.
3.  Update your PATH environment variable to include the bin directories under JAVA_HOME and GEMFIRE.
For example, for Unix Bourne and Korn shells (sh, ksh, bash):
> PATH=$PATH:$JAVA_HOME/bin:$GEMFIRE/bin;export PATHand Windows
> set PATH=%PATH%;%JAVA_HOME%\bin;%GEMFIRE%\bin
4.  Update your CLASSPATH environment variable to include the GemFire classes:
Unix Bourne and Korn shells (sh, ksh, bash):
> CLASSPATH=$GEMFIRE/lib/gemfire.jar:$GEMFIRE/lib/antlr.jar:$GEMFIRE/lib/gfSecurityImpl.jar:$CLASSPATH;export CLASSPATH
Windows:
> set CLASSPATH=%GEMFIRE%\lib\gemfire.jar;%GEMFIRE%\lib\antlr.jar;%GEMFIRE%\lib\gfSecurityImpl.jar;%CLASSPATH%
5.  Set a GF_JAVA environment variable to point to the java executable file under your JAVA_HOME.
Unix Bourne and Korn shells (sh, ksh, bash):
> GF_JAVA=$JAVA_HOME/bin/java;export GF_JAVA
Windows:
> set GF_JAVA=%JAVA_HOME%\bin\java.exe
 

Running in Pure Java Mode :


GemFire Enterprise is designed to run as documented on platforms running Solaris, Linux, and Microsoft Windows.
GemFire Enterprise runs with some functional differences in pure Java mode without GemFire native code.
In pure Java mode Gem Fire's Java code does not call any of its own native methods. Distributed system members still have access to Gem Fire's caching and distribution capabilities.
To run in pure Java mode, your application must have the proper CLASSPATH settings and must not have access to the GemFire native library.
Pure Java mode is enabled automatically when Gem Fire's Java code cannot load the GemFire native library. Pure Java mode can be forced on platforms that support native code by renaming the native library in the product tree, or by setting the GemFire.pure Java Mode system property to true on members running user applications.
The Programming APIs
The Java APIs, supplied in product Dir/lib/GemFire.jar, allow you to configure your distributed system and cache, manage and query cached data, and run administrative tasks.


Packages


com.gemstone.gemfire :
Statistics,Logging,DataSerialization,and System Failure.The classes, interfaces, and               exceptions used for logging and sta­tistics and for  data serialization and system failure  management. This includes the LogWriter and Statistics classes that allow application-specific logging and statistics gathering. This also includes DataSerializable and SystemFailure.
com.gemstone.gemfire.admin :
Administration API Tools for administering and monitoring GemFire distributed systems.
com.gemstone.gemfire.cache:
Caching An implementation of distributed object caching that is capable of leveraging GemFire’s distribution capabilities. This package includes Cache, Region, and Region.Entry interfaces.
com.gemstone.gemfire.cache.client:
Client Used to configure client applications for communication with cache servers.
com.gemstone.gemfire.cache.query:
Querying and Indexing An implementation of OQL querying for local cache data and continuous querying on a server by a client. Supplemented by querying shortcut methods in cache.Region.
com.gemstone.gemfire.cache.server:
Server Used to run GemFire servers and to replace the default GemFire server load probe software with custom software written by you.
com.gemstone.gemfire.cache.util:
Customized Caching Classes Utilities for use with the caching classes. These utilities include an object sizer that returns the size of the object passed in, con­venience stub implementation classes for GemFire application plug-ins  and customized application plug-ins that implement the client side in client/server caching.
com.gemstone.gemfire.distributed:
Distributed System Membership Common tools for  GemFire distributed systems including the Distributed Member and Locator classes.
com.gemstone.gemfire.security:
Security and Authorization Tools for authenticating and authorizing system and data access.


Tuesday, February 5, 2013

What is GemFire?


Generally the GemFire is a Command-line utility that allows you to start, stop, and otherwise manage GemFire locators from an operating system command prompt. The utility also provides license information and log management and merging. explained by Google web dictionary
GemFire Enterprise is in-memory distributed data management platform that pools memory (and CPU, network and optionally local disk) across multiple processes to manage application objects and behavior. Using dynamic replication and data partitioning techniques, GemFire Enterprise offers continuous availability, high performance and linear scalability for data intensive applications without compromising on data consistency, even under failure conditions. In addition to being a distributed data container, it is an active data management system that uses an optimized low latency distribution layer for reliable asynchronous event notifications and guaranteed message delivery. explained by gemstone.

VMware's Cloud-Based GemFire Makes It Easier To Work With Big Data
Contributed by VMware.
Why companies are moving to GemFire ?
All companies are struggling with the growth of information overload often referred to as “Big Data,” some IT developers and database deploys are approaching the challenge with a cloud-based service designed to make accessing mass amounts of data faster. In short  they are started to move to GemFire.
GemFire is a distributed in-memory data grid database software product that enables data distribution, data replication and partitioning (sharding- DB term), cashing data management at the exact moment the information is needed.
While the ability to move data from server to server and replicate it to more than one location has proven invaluable over the last few years, today's critical challenge is how can companies manage this data properly.
  • Maintain simultaneous data connections over long distances.
  • Protect their data from disasters.
  • Maintain data reliability and availability, even when server hardware periodically fails.
The software is able to achieve these goals by creating an object-oriented "data fabric" across a server cluster. It accesses copies of data that are stored in various locations as needed. To ensure compatibility with the latest cloud configurations, the management platform can spread the data across many virtual machines and GemFire servers to manage application objects.