Showing posts with label Vmware. Show all posts

Sunday, June 18, 2017

Fix - "Windows cannot find the Microsoft software license terms"


Usually this error will popup when you are trying to install a ISO in VMware workstation or Virtual Box and it wont let you install the OS.

     image


to fix this , simple answer is you have to avoid express installs feature in Vmware workstation or Virtual Box.

if you want the resolution in detail, Please follow the steps.


1.  you have to create a New Virtual Machine from the VMware workstation and choose the below marked option which will allow you to install OS later.

     image


2. Keep clicking next until you see the below option and click the “Customize Hardware”


    image


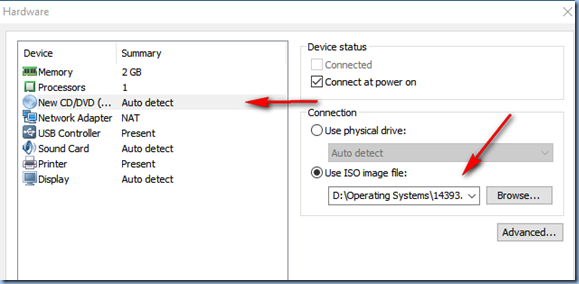
3.  then you have to select CD/DVD option and choose ISO image file as you see below then Finish.

        now you start the virtual machine and get succeed.

   image


Comment me for any clarifications or corrections.

Tuesday, April 14, 2015

How to install FreeNAS 9 on VMware workstation


This setup will help you guys to those who really needs to improve his skills about storage with clustering.

I assume that you have basic knowledge to create a virtual machine in vmware workstation.

Download your free ISO copy from here

Note : do not bother about the system requirements which is mentioned on FreeNAS site as they are for high performance with all features.

Step 1: Create a virtual machine in below configuration.

feauszr

Step 2: Add FreeNAS.ISO file into the newly created virtual machine’s CD/DVD (IDE) from the VM settings (see above image)

Step 3: PowerOn the VM and wait to see the below screen then Hit Enter or wait to autostart.

dixxm3m

Step 3: Hit 1 to install

q4bxtmx

Step 4: Choose the available drive to install like below screen

tsq1p3v

Step 5: Hit YES to the warning like the below screen( you have nothing to loss in the new virtual disk)

pi3insv

Step 6: Set the password

ie5ghkt

Step 7:  sit back and relax until you see the below screen and reboot once you click Ok on the below.

cniuwhe


Step 8 : Now for the first boot will take some time based on your configuration and finally you will see screen like below

image

Step 9: Now use IP from the step 8 and open it from any browser

Note : Username : root   Password : which you set during the installation.

image


Step 10: If you want to set a Static IP ofcourse you need it so go to “ Network “ Icon on Top row then “Interfaces”

2015-04-14_181448

“add Interface” like the below image only 3 fields is enough and save it. now you need to type new IP to access FreeNAS

2015-04-14_181742

Now you are good to proceed further to configure ISCSI or other services that you want.

Please write to me for queries.

Tuesday, February 3, 2015

How to add Active directory to vCenter


This tutorial will guide you to join vCenter with AD so that you can login with accounts that are available in AD.

I am using vCenter 5.5 version on my test lab.

I guess you don’t have any difficulties on Simple installation of vCenter Server in windows machine

also I assume that you have checked the option called “windows authentication”  while installing vCenter server.

make sure vsphere web client is working on the local machine(vCenter Server installed machine) by opening the below url

https://localhost:9443/vsphere-client/

if you are able to see the below screen then you are good to proceed.

image


use default user name to manage the vCenter

User Name : administrator@vsphere.local

password : the one you given at the time of vCenter installation.

Step 1: go to Administration

image

Step 2 :  Configuration –> Identity Sources—> click the green Plus symbol

image

Step 3 :  then choose “Active Directory(Integrated Windows Authentication) click Ok.

Note : now you just enable the AD authentication. you have to add the AD Groups in next steps.

image

Step 4 : Click the vCenter from left pane again you have to click the another vCenter tab which will come after that now you will see number of vCenter servers that are available in your network.

select the vCenter name –> manage –> permissions –> Green plus symbol to add the users from AD.

image

Step 5 : choose the type role that you want under the “ Assigned Role “ then “Add” left side of the same window

now you will see the other window which shows your Domain name and groups / users which are available in AD.

choose the Group / User that you want to give the permission.

image

Now you are done.

Just logout then try with your AD User name with password.

any issues ? email me.

Monday, February 2, 2015

Fix – VMware workstation 10 on win 8.1 for “not enough physical memory”


If you are getting “not enough physical memory” error like the below screenshot when you start the virtual machine ? well here is the simple fix which is recommended by vmware.

image


Go to Control Panel –> Program and features—> Uninstall Program –> View Installed Updates (right panel)

--> sear for this update “KB2995388”  and remove it .

Restart is optional


thats all.   Now you can simply start the virtual machine with no problems.

Saturday, August 23, 2014

Convert KVM to Vmware


Simple way to convert KVM images to make use of it in VMware

Step 1.

Shutdown the KVM guest

Step 2.

convert the QCOW2 or RAW format to VMDK format

# qemu-img convert image.img -O vmdk image.vmdk

Step 3.

Upload this image to datastore

Step 4.

Create a new virtual machine with this disk image

Note :-

If you face any issues with NICs remove and re add it , you should be good.

for more commands click here

Saturday, December 7, 2013

Intel VT-x / Intel VT-i / Intel VT-d / Intel VT-c


Intel VT-x (previously known as Intel VT) is the implementation of an Intel Secure Virtual Machine for the x86 IA-32 and Intel 64 architectures. The older designation, “Intel VT” (without the “x”), continues to be used by many BIOS menus.

VT-x is necessary for Intel systems in order to:

  • run domUs under Xen Hardware Virtual Machine (HVM) (as well as run a guest system under Windows).
  • run 64-bit guest systems under VMware.[1]
  • to run virtualization with KVM.[2]

Information regarding the activation of Intel VT-x at the BIOS level (if supported by the Intel processor) can be found in the article, Activating the Intel VT Virtualization Feature.

As of the Nehalem architecture (Intel Xeon 55xx CPUs), VT-x includes the Intel Extended Page Tables (EPT).[3][4]

Intel VT-i (Intel Virtualization Technology for Itanium Processors)

Intel VT-i is the implementation of an Intel Secure Virtual Machine for the IA-64 architecture (Itanium).

Intel VT-d (Intel Virtualization Technology for Directed I/O)

Intel VT-d makes direct access to a PCI device possible for guest systems with the help of the Input/Output Memory Management Unit (IOMMU) provided. This allows a LAN card to be dedicated to a guest system, which makes attainment of increased network performance beyond that of an emulated LAN card possible. Of course, once such a direct access system has been implemented, live migration of the guest system is no longer possible. VMware can be configured for use with an activated Intel VT-d system using VMware VMDirectPath for direct access to PCI cards.

Pre-requisites for Intel VT-d

  • The chip set as well as the BIOS used must support Intel VT-d.
    • Requires the Intel Nehalem or later micro-architecture, such as that found in Xeon 34xx, 55xx and more recent, as well as other, desktop CPUs (see A List of Intel CPUs).
    • There are no special requirements placed on the CPUs themselves, since VT-d is a function of the chip set. The CPU need merely support VT in general (see [5]).

Information regarding the activation of Intel VT-d at the BIOS level (if supported by the Intel processor) can be found in the article, Activating the Intel VT-d Virtualization Feature.

For additional information regarding VT-d, see:

Intel VT-c (Intel Virtualization Technology for Connectivity)

Intel VT-c is a collection of input/output (I/O) virtualization technologies. These technologies include:[6]

The article, Activating the SR-IOV Virtualization Feature contains additional information about activating SR-IOV.

For additional information regarding VT-c, see:

The following, as well as other, platforms support VT-c:

  • Intel 75xx systems (Intel 7500 Chipset Boxboro-EX)[7]

Configuring VMDirect Path I/O pass-through devices on an ESXi host


You can connect up to two passthrough (ESX 4.0) and up to four passthrough (ESX 4.1) devices to a virtual machine. When selecting the devices, keep in mind these restrictions:

Configuring pass-through devices

To configure pass-through devices on an ESX host:

  1. Select an ESX host from the Inventory of VMware vSphere Client.
    Note: If you have a chipset with VT-d, when you click Advanced Settings in vSphere Client, you can select the devices that are dedicated to the VMDirectPath I/O.
  2. In the Configuration tab, click Advanced Settings. The Pass-through Configuration page lists all available pass-through devices.
    Note: A green icon indicates that a device is enabled and active. An orange icon indicates that the state of the device has changed and the host must be rebooted before the device can be used.
  3. Click Edit.
  4. Select the devices and click OK.
  5. When the devices are selected, they are marked with an orange icon. Reboot for the change to take effect. After rebooting, the devices are marked with a green icon and are enabled.
    Note: The configuration changes are saved in the /etc/vmware/esx.conf file. The parent PCI bridge, and if two devices are under the same PCI bridge, only one entry is recorded.
    The PCI slot number where the device was connected is 00:0b:0. It is recorded as:
    /device/000:11.0/owner = "passthru"
    Note: 11 is the decimal equivalent of the hexadecimal 0b.

To configure a PCI device on a virtual machine:

  1. From the Inventory in vSphere Client, right-click the virtual machine and choose Edit Settings.
  2. Click the Hardware tab.
  3. Click Add.
  4. Choose the PCI Device.
  5. Click Next.
    Note: When the device is assigned, the virtual machine must have a memory reservation for the full configured memory size.

Sunday, October 27, 2013

How to change MAC Address of existing Virtual Machines


I was having problem with my ethernet MAC in one of my VMs. I just did remember that I did not write post about this, so I am writing this now.

You will be simply failed if you have tried below things..,

1. Removing that ethernet from VM and adding new one

2. Generate a new MAC from the ethernet settings.


So what is the work around ?

lets start…,

Step 1.  Go to your VM working directory to the one you are facing issues. from Virtual Machine settings.


Step 2.  Edit the .vmx file by any text editor and find the below three entries below and remove completely from that file.

In my case these are below entries for you it will be in enthernet[n].generatedAddress= “your current MAC”

ethernet0.generatedAddress = "00:0c:29:2b:5b:8e"

ethernet0.generatedAddressOffset = "0"

ethernet0.addressType = "generated"

image


Step 3.  Add a new static MAC address line to the configuration file with help of the following entries:

ethernetN.address = "00:50:56:XX:YY:ZZ"
ethernetN.addressType = “static”

XX should be  hexadecimal number between 00h and 3Fh,

YY  and ZZ should be  valid hexadecimal numbers between 00h and FFh.

Saturday, October 5, 2013

Fix - Transport (VMDB) error–44 on VMware workstation


Are you getting the below error every time you run or while powering on your virtual machine ?

image

No worries. Yeah there is a workaround.

Method 1 :-

Open the VMware Workstation with Administrative Rights.

that’s all.

image


Method 2 :-

You don’t want to every time to choose Administrator ?

Lets do this  for one time

Go to “properties” from exactly above picture and follow the below instructions

image

Yes you are done. hereafter you can simply open VMware workstation it will elevate the Administrative rights.


Hope it helps.


Write me for questions.

Saturday, May 18, 2013

P2V of a Physical Machine with vCenter Converter


P2V is a large subject to cover, as I cannot cover every scenario, so I am going to briefly cover a P2V conversion of an physical Ubuntu server I have kicking around. Many companies are trying to reduce there footprint and convert many physical machines into virtual ones, web servers, SMTP server are ideal candidates. The conversion is a two step process, the actual conversion and the cleanup process after you have created the VM. There are a number of 3rd party P2V converters including free ones but I will be using VMware own vCenter Converter to perform this task. Vware vCenter converter is a windows based application, that installs onto the vCenter management server, it fully supports both windows and linux conversions but you may want to check VMware own website for all the available supported OS's. There are two versions of the converter available

Starter - is agent based and is free
Enterprise - can be either be agent or can boot from a cd

VMware vCenter converter is not a silver bullet, you may have to work with the converted VM to get it working properly, also if the server originally had problems those problems may be replicated in the VM environment. The more complex the physical server (could be a domain control, cluster server, etc), the more you may have problems converting it and getting it to work, here is where you need to look at the VMware forums or search the internet for answers.

Installing vCenter Converter

Installing the vCenter converter is like a normal application installation, on the vCenter server start the installation by putting in the vCenter 4.1 cd, and then selecting vCenter Converter

During the installation process, you will be asked about the vCenter management server details

Once the installation has finished select the plugins -> manage-plugins from the top bar of the vCenter window, then select download and install plugin

That's it, you are now ready to convert physical servers

P2V

Once you have the P2V plugin installed we can now import a physical server, I have a old HP D510 desktop PC with Ubuntu 32-bit OS running on it (yep old pc and old OS), lets convert this physical machine into a virtual machine. First select the ESXi server that you wish to import the new virtual machine into, in my case I have selected vmware01, right-click and select "import machine"

Now enter the details of the running physical server, I selected "view source details", just to make sure the connection is working and we have access to the physical server

All looks good, it see's my physical server as a Ubuntu 8.04 32-bit server

The next screen, gives us details on where the VM will be placed, I changed the datastore to a shared storage area (filer2_ds1), you can change the name of the VM if you wish

The screen allows us to configure the VM's hardware

I notice that the network was in correct, so selected edit and changed the network from private to public and can add additional NIC's if you wish

The "data to copy" screen allows us to select what volumes/filesystems we wish to copy across, there may be a case that you do not some volumes/filesystems copied and thus speed up the importing process.

With very little effort we are at the summary screen ready to import our physical server

It took about 5 minutes to import this server, the time it takes all depends on how much data you need to import, you can monitor the progress from the "recent tasks" window in the vCenter man screen

And here we have it, a fully imported physical server, I double checked the hardware settings and it done a pretty good job as I did not have to change anything

When I started the VM, all I had to do was edit the /etc/network/interfaces file and change the NIC to eth3 and up the interface and away we go, as you can see below

Ok not all P2V conversions will go as smoothly as this one did but you get the idea on what is involved and what you need to prepare before hand when performing a P2V conversion. There is also a Cold-Clone boot CD which allows you reboot the physical server from the CD and clone the physical server while it is offline.

Thanks to datadisk UK

Saturday, April 27, 2013

How to Increase Disk Space in VMware

Have you ever encountered out of disk space issues on your wonderful VMs when trying install a critical application? Here are a few easy steps that help you to solve the disk space problems on your VMware workstation VMs.

This article assumes that the reader has familiarity with virtualization and has some practical experience with VMware products like workstation.

1. Make sure the following prerequisites are met:

     The virtual machine is powered off.

     The virtual disk is not mapped (on Windows guests) or mounted (on Linux Guests).

              You cannot expand a virtual disk while it is mapped or mounted.

     The virtual machine has no snapshots.

     The virtual machine is not a linked clone or the parent of a linked clone.

      To determine whether the virtual machine has snapshots, is a linked clone, or is the parent of a linked clone, check the information at the top of the Summary tab for the virtual machine.

2.  Select VM > Settings.

3   On the Hardware tab, select Hard Disk for the virtual hard disk to expand.

4   Select Utilities > Expand.

5   Set the new maximum size for the virtual disk.

6   Select Expand.

7   Click OK after the disk expansion process is complete.

8   Download the Gparted iso. Gparted is a free disk management tool. You can use any of the available tools.

9   Mount the Iso on the VM that we have just expanded and power on the VM. Ensure that the VM boots from the Gparted iso.

Gparted provides a friendly UI to do partition and disk operations. The expanded size would appear as unpartitioned space. Resize the existing volume to claim the expanded size. Apply the changes and reboot.

10   On Reboot, the disk would reflect the new size.

How to Install VMware vSphere 5.0 on VMware Workstation 7.1 as a VM

Installing VMware vSphere 5.0 on VMware Workstation 7.0 gives IT professional flexibility to learn or play with new VMware releases. This method will be ideal for test and play around with VMware vSphere 5.
Follow the steps to install ESXi 5 on  VMware workstation 7 on Windows7.
Also I have covered how to upgradeVMware ESXi 4.1 U1 to VMware ESXi 5.0 in below post,
VMware vSphere 5.0 Virtual Machine inside Virtual Machine nested Guests
VMware ESXi 4.1 to VMware ESXi 5.0 Upgrade Process
Download VMware vSphere 5.0
Minimum Requirement for VMware Vsphere 5.0 on a VMware Workstation,
1. Hardware virtualization should be enabled on motherboard bios. or you will get below message during setup 

2. CPU with 2 Core or else you will get error message during setup. Check below screenshot for more details,


3. Minimum 2GB RAM for VMware vSpehere 5 virtual machine. So, you must have minimum 3GB RAM on computer. In my case I using 4GB Ram, as I have 12GB of Ram on my laptop.
Follow below Installation Steps for ESXi5 on VMware Workstation 7
Select New Virtual machine option in File menu and start with custom.


Select Workstation 6.5-7.0 virtual machine hardware compatibility option,

Specify location of your Vmware ESXi 5.0 ISO image,

Select Red Hat Enterprise Linux 5 64 bit as a guest Operating for our VMware ESXi 5.0,

Give Virtual Machine name & location,

Here select “Number of Cores per Processor to 2″ otherwise you will get error message during setup. ESXi 5.0 requies 2 cores per processor.

In my case I am using 4GB memory for VMware ESXi 5.0

Use Network type as NAT

Select LSI logic


Click on customize hardware

Remove unwanted hardware such as Floppy drive, USB Controller & Sound Card from your VMware ESXi 5.0 Virtual Machine,

Under Display configuration select “Accelerate 3D Graphics”

Now Virtual machine will start, press enter to continue the setup,


Press Enter to Continue,

Accept VMware License agreement,

Now press enter to install VMware ESXi 5.0 on below storage device as shown in screen shot,

Select your keyboard layout,

Enter Vmware ESXi 5.0 root password, 

Press F11 to install


Now installation has been completed, so press enter to reboot your VMware ESXi 5.0 Virtual Machine,

Now you can see the installed VMware ESXi 5.0  Build 469512

That’s it, now your VMware ESXi 5.0 ready. VMware ESXi 5.0 in evalution mode will work for 60 days, for further use reapply your ESXi 5.0 license to the ESXi 5.0 server.
Now its time to download VMware vSphere Client 5.0, Enter your Vmware ESXi 5.0 Server IP address in Internet Explorer & download VMware vSphere Client 5.0.


VMware vSphere Client 5.0 installation is easy & straight forward. After installation open  VMware vSphere Client 5.o & enter your username & password.


Hope it helps ....,